Frank
Lyne's
Mid
Sized Sculptures
|
LADY WITH
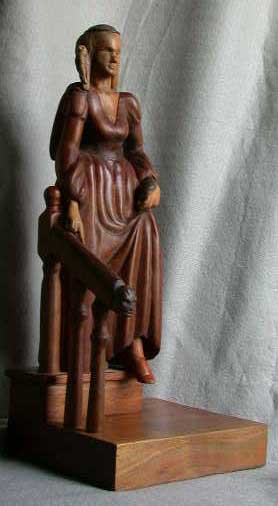
KESTREL
Mahogany,
Persimmon, Walnut, Cedar - 20.5 x 8 x 9 inches – 1987
Joints are the most
difficult part of making a carving with multiple pieces of wood,
but joints can give color contrast to different elements and can
give one more freedom to extend a figure in multiple directions.
Lady With Kestrel could have potentially been carved from one
billet, but would have lacked color contrast among the various
parts. The figure's arms in Elegy extend at right angles from her
shoulders. Her forearms extend at right angles from her upper
arms. That would have been tough to do from a single billet.
|
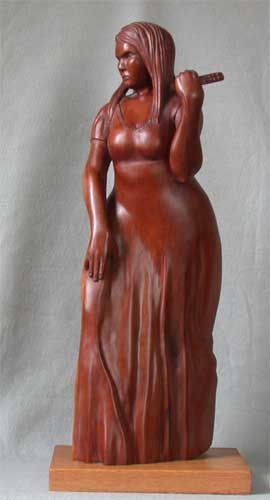
REMOTE
Cherry, Oak base –
29 x 12 x 9 inches – 1994
The title Remote
comes from this figure's distant expression and from the TV
remote control she's holding in her left hand.
|
|
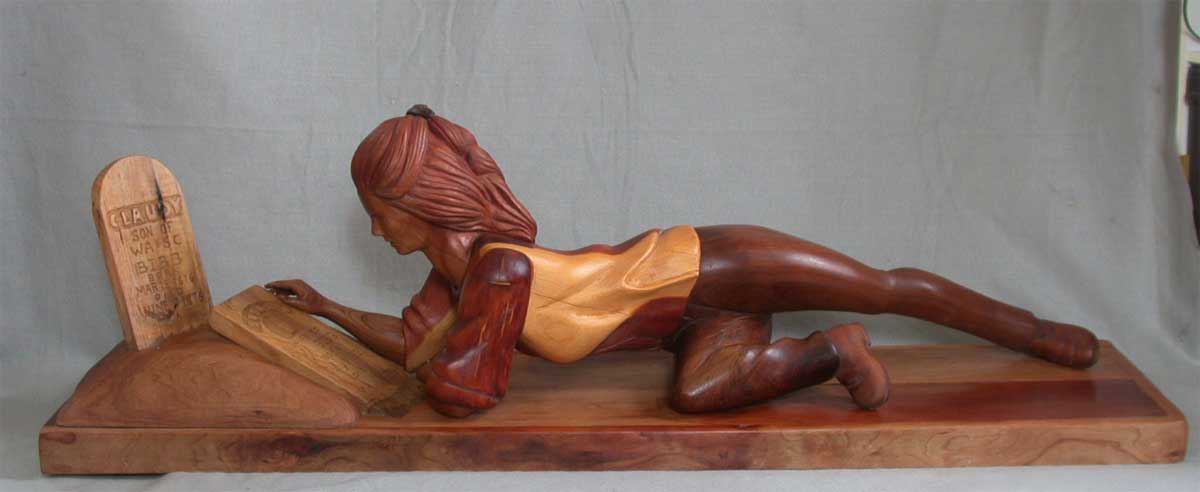
Elegy
Cherry head, arms
& base, walnut pants, cedar shirt, persimmon tombstones,
mahogany shoes & barrette – 16 x 54 x 36 inches – October
18, 1995 – February 13, 1996
This carving depicts
a figure who has discovered two graves and is examining the
headstones. The headstones are replicas of actual headstones I
found in a small thicket while roaming my neighborhood. Susan C.
Bibb died March 19, 1876 at the age of 24, one day after giving
birth to an infant son named Claudy. Claudy died a few months
later. There was no headstone for the father, W. A. Bibb. A
decaying log house sat nearby and there was a patch of buttercups
and a pink hyacinth. Today the site of this cemetery is part of a
grain field. No evidence remains there there was ever a cemetery
there. I did not realize when I made this carving that it would
become the only memorial to Susan C. Bibb.
|
|
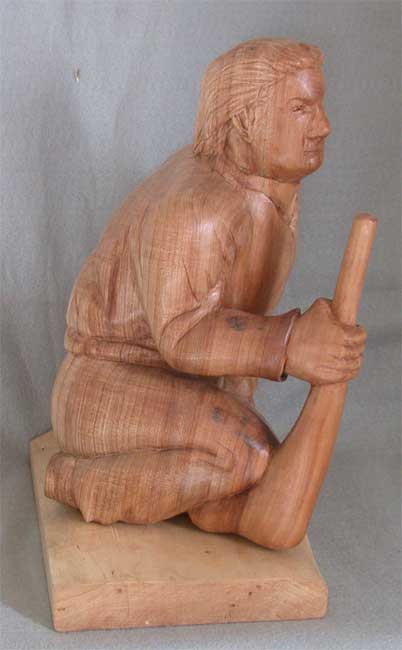
DETERMINATION
Sugar
Maple – March 18, April 14, 2008 – 15.5 x 11 x 10 inches
|
Determination was made
from a quartered maple log. The right hand and the crutch it holds
came from the extreme inner portion of the original quarter section.
The back of the figure follows the rounded outer edge of the original
billet. There weren't any major cracks showing when I began carving,
but this billet contained a hidden flaw often found in my cache of
maple - an internal crack that didn't show on the outer surface. Most
cracks begin on the outer perimeter of a billet and gradually grow
inward with more drying. I think this particular hidden crack may
have been caused by lightning or wind damage to the living tree
before it was cut. I was able to obscure this crack with a crease in
the shirt on the inner side of the right collar bone.
Wood
Split Prevention
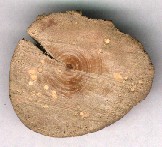
The Dogwood
cross section shown below illustrates the simplest way wood splits as
it dries and shrinks. A log doesn't just simply get smaller as it
loses moisture. Rigid vessel and fiber walls, the grain of the wood,
prevent it from losing hardly any length. Ray cells, a special type
of rigid support tissue that grows outward from the center prevents
it from losing hardly any girth. When a log is cut, the vessels,
which in the live tree were taut with water traveling up from the
roots to the leaves, gradually lose that water. The vessel walls then
draw a little closer together. Something has to give. If the ray
cells won't let things shrink toward the middle then the only thing
left to do is to shrink sideways to a line running toward the middle
(tangentially).
This will
happen in nearly all
cases to entire round logs no matter how carefully drying is
controlled. The only permanent prevention for this natural phenomenon
is to replace the water in the wood with a substance that won't
evaporate out. My former sculpture teacher, Olen Bryant, gave me a
gallon jar of an unidentified substance which was represented to him
to work as a crack preventative. That jar is sitting on the shelf
behind me on my page showing a wood carving holding
block. Olen couldn't remember what it was called, but I think it
must be
polyethylene glycol. It has the color and texture of lard up to
about 90° F., at which point it turns into a clear liquid. I have
used it a few times on developing splits in ongoing carvings. It
works in that it causes the developing cracks to close up, but if the
wood it's applied to isn't later cut away, that area won't absorb
whatever finish is applied to the completed carving, making it a
slightly different color than the rest of the carving. Coating a
developing split with some of the same surface protection that will
be applied to the finished carving will help some and shouldn't cause
any later problems with surface color unevenness.
It may also
help some to apply clear varnish to the end grain of green logs
stored for seasoning. Cracks usually begin on the ends of logs and at
the outer perimeters, where open vessels are exposed like so many
microscopic hose pipes. Varnish might help more if applied to the
outer portion of the end grain only, because that will slow
evaporation where it happens most rapidly.
My usual
prevention for splits in wood carvings is to not use entire round
logs for carving. The first thing I do to any new log I obtain is
split it lengthwise into half logs or maybe even quarter logs if that
will still make reasonably large billets. Then as this wood dries,
the outer edges can shrink around the axis of the center without
cracking.
More
on wood split prevention
Any small
split present on an unsealed wood block will get worse with a sudden,
dramatic change from high to low humidity. This can happen if a wood
block is brought from an outdoor location into a heated or
air-conditioned house or if the weather changes to a dry pattern
after a long period of wet weather. I work in an unheated shop and do
not bring unfinished carvings into the house if the heat or
air-conditioner is running, so artificial changes in humidity aren't
a problem for me. Natural humidity changes are another matter. Spring
2003 was unusually cool and wet. Then the weather changed suddenly to
a hot, dry pattern. Soon after this weather change, a split about a
sixteenth inch wide opened up on my carving in progress where before
there had been only a faint, almost invisible line. I was able to
make this crack close back up by doing two things. First I put tung
oil varnish on the surface that was splitting to prevent further
rapid drying in that area. Then I drilled some large holes on the
underside of the carving and expanded these holes with a chisel to a
large hollow within the thick mass that was developing the split.
This gave surface area for evaporative loss and shrinkage on the
interior of the carving. Within a couple of hours the split had
returned to being the faint, almost invisible line it was before. Now
that the carving is completed and the entire surface is sealed with
tung oil varnish it is no longer so adversely affected by humidity
changes.
Bark
left on or stripped?
It may seem
logical to leave bark on logs while they're seasoning to slow the
drying rate. Bark may indeed slow the drying rate some, but the most
rapid drying is at log ends, where open vessels are exposed. Wood
boring beetles are more apt to find places to lay eggs in bark than
in exposed sap wood. Although bark peels off more easily from
partially seasoned logs than from green logs, you may find that after
seasoning wood with the bark on, you will have to cut away several
inches of worm damaged sapwood. Worms are not as bad about
penetrating heartwood because they are repelled by tannins, the waste
products of trees, which build up in the heartwood. Sometimes worms
are already present in living trees before they're cut, but most
often worms get started while wood is in storage.
Crack
patching
Having a
split in a wood carving isn't the end of the world. Splits can be
patched after they are completely done developing. If you are working
with green wood, another split may develop beside your patch work
later on. That's why it's better not to work with green wood. Before
applying a patch, any split must first have straight, parallel edges
so a well measured patch can be inserted. The tools required to make
those edges straight and parallel vary infinitely, but often include
a hand saw and or some files. You may email
me for advice on specific problems or to add your own tip to this
article. Five examples of my own crack patching can be seen on this
page.
return to
- Lyne Art - Frank
Lyne woodcarvings - Alison
Lyne paintings