 |
by Alison Davis Lyne
This page is meant to be a visual version of my verbal Art Tips section. I hope to highlight, with words and images, various art techniques. I also hope to have, from time to time, the art techniques of other illustrators. Since everyone's style is different, we will all use an art technique differently, so sharing techniques just enriches us all. If you want to submit an art technique tip, just let me know at alison@lyneart.com To see more of the end results of my artwork you can go back to my main section, and choose another catagory from the icons, which go to other pages on my website.
This visual art tip is born of my current interest in sequential art/graphic art/comic art style. So far I've done a few try outs of this kind of art work. i.e. telling a small story with mostly visual clues, and a bit of dialog. You can see more at my Molly Pitcher page and my Thomas Paine page.
I've read way too many graphic novels, comic books, and manga books in the past year or so, in an effort to learn what is going on today in this genre. I've also amassed quite a collection of "how to" books on the subject. I am about midway in a learning curve for Photoshop, currently just Photoshop Elements 3, that came with a Wacom tablet. With all this in the works, I am putting out in this visual art tip my current work flow. I'd love to hear from those of you out there that are involved in this genre, about how YOU go about creating your story.
So far I have started with an idea for a story line. In the case of Molly Pitcher, I came across a paragraph in a autobiography of a Revolutionary soldier, that talked about a battlefield incident. It's action vaguely reminded me of a "Matrix moment", so I thought it might be a nice place to start.
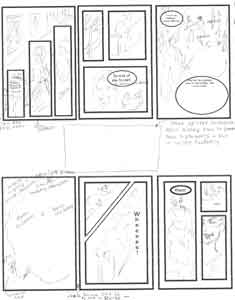
I did a half a dozen small sketches for as many pages. I then drew out the panels in Photoshop, to give myself a roadmap for how the action sequence might go. I found a neat tip for outline and composing boxes of art on a page in Digital Manga Techniques by Hayden Scott-Baron. This is what my panel and sketches page looked like for an upcoming page on Mercy Otis Warren:
|
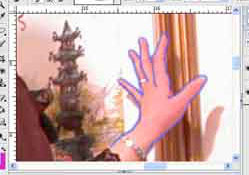
Then I went back to my files to find photo references, and what I didn't have already, I got photos of with my handy digital camera, (either using myself as a model, or getting a release if I snap someone else's image). I then downloaded them to Photoshop, and pulled them up individually. Using a tip I found in Computer Cartoon Kit by Steve Marchant I then made a new layer on top of the photograph, and draw an outline of just what I need for the art. You can see below where I've started on a drawing of my hand, outlined in blue. This allows me to quickly get just the image I need, and also practice my drawing of the underlying bone/muscle structure, as I usually have to make adjustments in a pose. I often combine elements of two or three different photos; an arm here, a hand there....whatever is needed. I'm trying the old school of "on the job training"; learning (and relearning)drawing while I'm working on a project. I've also found Facial Expressions by Mark Simon to be invaluable. Saves a lot of twisting my face out of whack while trying to catch just the right expression in a mirror!
 |
I then print out the composite outline image. I take this to my light box and trace over the composite, adjusting things as I go. Then I would proably go ahead and either ink in the outline and/or paint in colour. I know I could just as easily continue in Photoshop, and do it all on the computer...but I've found I still very much enjoy working in traditional media. For the moment I have the time to do it this way....that may change in the future.
So far I've been doing each panel separately, drawing them about 5 inches by 9 inches. Then when finished with the artwork panel, I scan each back in to Photoshop. I'm doing things this way, as my scanner is only letter size, and a normal size page (something in the area of 10 inches by 15 inches) is way too large to scan in one screen. I've tried doing it in two sections then stitching together in Photoshop, but haven't been too pleased with the results. The second reason is I may, when I get a page together, decide that one of the panels just "doesn't work". With the panels done individually then assembled at the end, I have the option to change out, and resize panels with complete freedom. The only draw back to this is my final output would HAVE to be in Photoshop, and not a complete traditional A4 size finished page of artwork. I'm still working out how I wish to present my final artwork....a lot of which depends on what a given publisher might need.
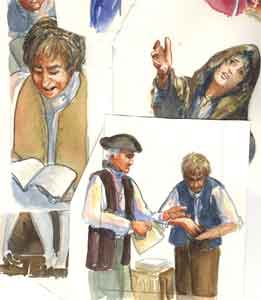
Below is a composite of some of the individual panels I worked on that were assembled in the pages I did on Thomas Paine. As with both Molly Pitcher and Thomas Paine, I used Photoshop to insert text. I tried doing my own hand lettering on the original hardcopy pages of Molly Pitcher, but found I just don't have the skills at the moment to do lettering. I end up having to actually "draw" each letter, and it's a skill that takes a LOT of time to master. Until/unless I find that I have to master this particular skill, I think I'm going to leave that to the professionals, and cheat and use Photoshop.
 |
My work flow in this particular style, is an ongoing "work in progress" in and of itself. I'm learning more about it as each day goes by....and I read more about how other artists are working.
I'd love to hear from YOU, about how you work on sequential art, and things that make it easier to "Tell the Story".
return to - Lyne Art - Frank Lyne wood carvings - Alison Davis Lyne illustrations-Visual Art Tips page